


플로팅 액션 버튼에 기능을 추가해볼게요.
onPressed: (){}, 에서 {}이 안에 실행할 코드를 넣습니다.
간단히 print()문으로 'everdevel'을 출력해 봅시다.
onPressed: (){
    print('everdevel');
},
플로팅 액션 버튼의 코드는 다음과 같죠.
floatingActionButton: FloatingActionButton.extended(
    onPressed: (){
      print('everdevel');
    },
    icon: Icon(Icons.add),
    backgroundColor: Colors.red,
    label: Text('push'),
),
그럼 앱을 실행 후 버튼을 눌러보세요.
안드로이드 스튜디오 하단의 콘솔에서 누를때 마다 everdevel이 출력됩니다.
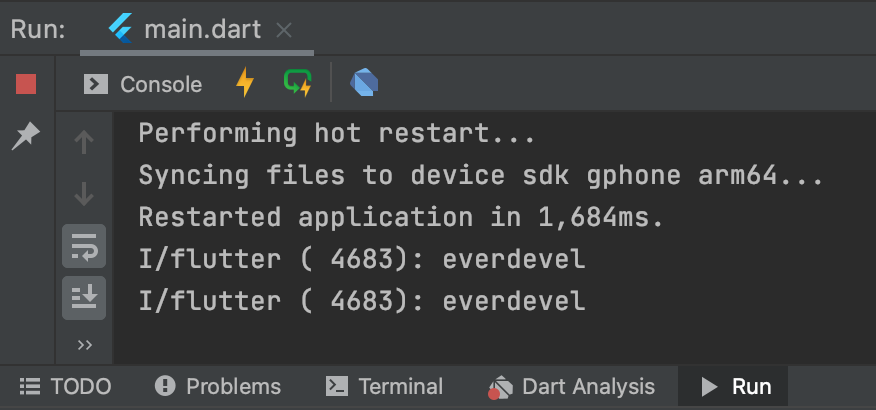
자 이렇게 액션버튼에 기능을 추가 해 봤습니다.
이제 화면 가운데 0을 출력하고 플로팅 액션 버튼을 누를 때 마다 1씩 추가되는 기능을 만들어 봅시다.
먼저 화면 가운데 Text위젯으로 0을 찍어 봅시다.
Scaffold클래스에서 위젯은 body안에 위치해야합니다.
Scaffold클래스의 다음의 코드를 추가할게요.
body: Center(
    child:Text(
        '0',
        style: TextStyle(fontSize: 100),
    ),
),
body빼고는 다 아는 코드죠.
현재까지의 _MyAppState 클래스의 전체 코드는 다음과 같습니다.
class _MyAppState extends State<MyAppState> {

  @override
  Widget build(BuildContext context) {
    return Scaffold(
      appBar: AppBar(
        title: Text('everdevel'),
        centerTitle: true,
        leading: Icon(Icons.menu),
        actions: [
          Icon(Icons.search),
          Icon(Icons.attach_file),
        ],
      ),
      floatingActionButton: FloatingActionButton.extended(
        onPressed: (){
          print('everdevel');
        },
        icon: Icon(Icons.add),
        backgroundColor: Colors.red,
        label: Text('push'),
      ),
      body: Center(
        child:Text(
          '0',
          style: TextStyle(fontSize: 100),
        ),
      ),
    );
  }
}
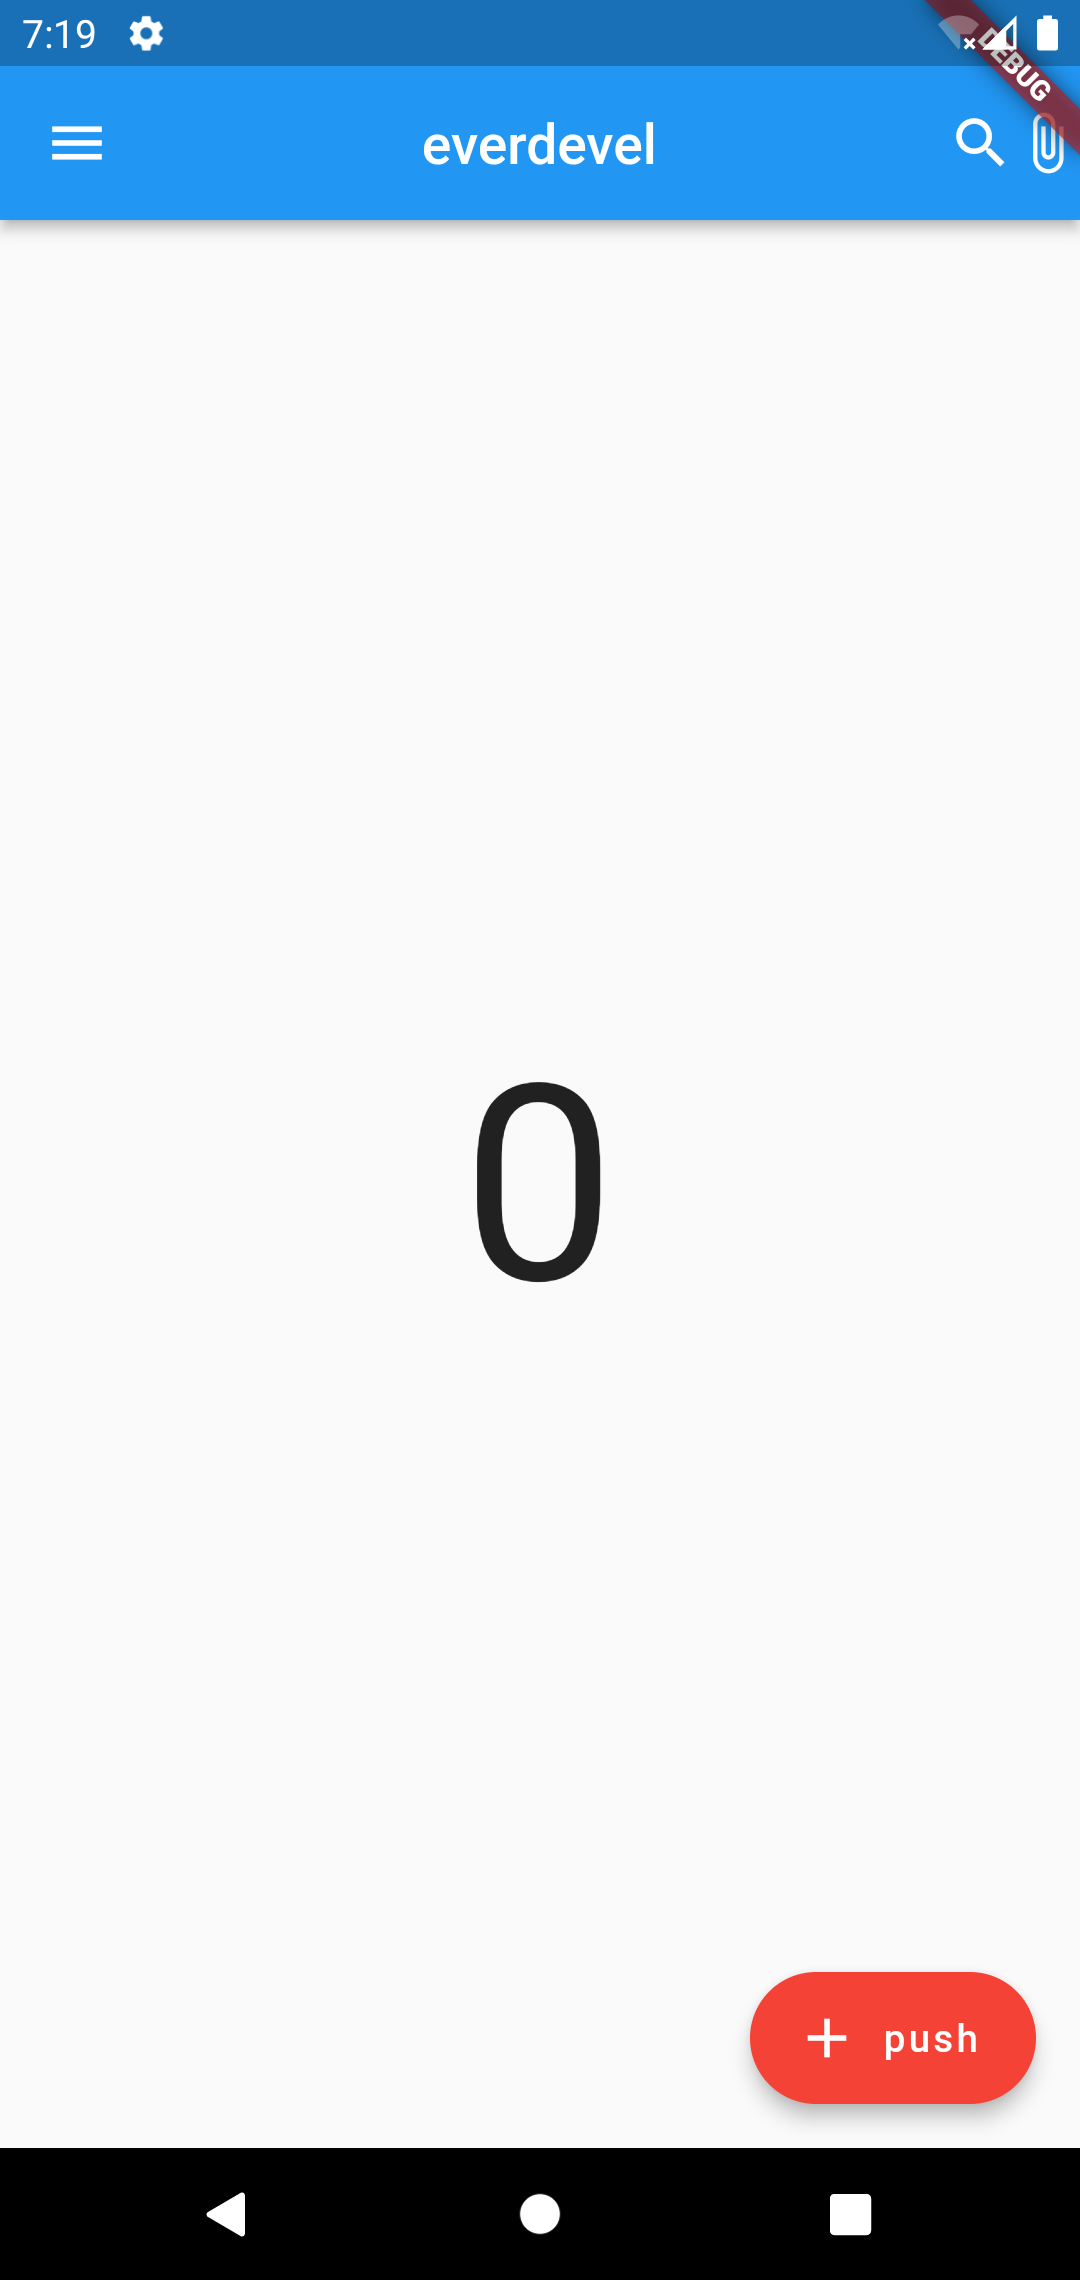
결과를 보면

그럼 이제 변수를 하나 만들겠습니다.
변수는 어떤 변수냐면 카운터의 수를 대입하는 변수입니다.
클래스안에서 사용하므로 프로퍼티(property)라고 해야겠네요.
프로퍼티명은 counter이고 기본값 0 으로 대입합니다.
다음의 코드를 _MyAppState 클래스에 추가합니다.
int counter = 0;
그리고 body안에 있는 Text 위젯의 값을 위의 프로퍼티로 바꿉니다.
body: Center(
    child:Text(
        '0',
        style: TextStyle(fontSize: 100),
    ),
),
body: Center(
    child:Text(
        '$counter',
        style: TextStyle(fontSize: 100),
    ),
),
복잡하니 여기서 한번 현재까지의 코드를 확인합시다.
현재까지의 _MyAppState 클래스의 전체 코드는 다음과 같습니다.
class _MyAppState extends State<MyAppState> {
  int counter = 0;

  @override
  Widget build(BuildContext context) {
    return Scaffold(
      appBar: AppBar(
        title: Text('everdevel'),
        centerTitle: true,
        leading: Icon(Icons.menu),
        actions: [
          Icon(Icons.search),
          Icon(Icons.attach_file),
        ],
      ),
      floatingActionButton: FloatingActionButton.extended(
        onPressed: (){
          print('everdevel');
        },
        icon: Icon(Icons.add),
        backgroundColor: Colors.red,
        label: Text('push'),
      ),
      body: Center(
        child:Text(
          '$counter',
          style: TextStyle(fontSize: 100),
        ),
      ),
    );
  }
}
자, 그럼 실행해보면 변수의 기본값인 0이 나타납니다.
자 이제 onPressed에 증가 연산자인 ++를 사용해 프로퍼티 counter의 값을 1씩 증가시킬거에요.
onPressed 코드를 수정할게요.
onPressed: (){
    print('everdevel');
},
onPressed: (){
    counter++;
    print($counter);
},
값이 1씩 올라가는지 확인하기 위해 print()문으로 출력해서 확인합니다.
현재까지의 _MyAppState 클래스의 전체 코드는 다음과 같습니다.
class _MyAppState extends State<MyAppState> {
  int counter = 0;

  @override
  Widget build(BuildContext context) {
    return Scaffold(
      appBar: AppBar(
        title: Text('everdevel'),
        centerTitle: true,
        leading: Icon(Icons.menu),
        actions: [
          Icon(Icons.search),
          Icon(Icons.attach_file),
        ],
      ),
      floatingActionButton: FloatingActionButton.extended(
        onPressed: (){
          counter++;
          print(counter);
        },
        icon: Icon(Icons.add),
        backgroundColor: Colors.red,
        label: Text('push'),
      ),
      body: Center(
        child:Text(
          '$counter',
          style: TextStyle(fontSize: 100),
        ),
      ),
    );
  }
}
자, 그럼 실행해 볼게요.
실행 후 플로팅 액션 버튼을 4회 눌렀습니다.
콘솔을 보면 이렇게 ++에 의해 1씩 늘어나 값이 4가 되었습니다.
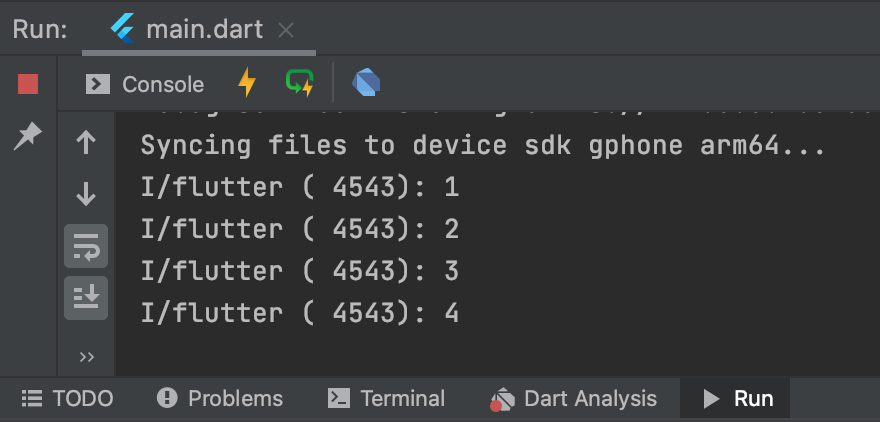
하지만 앱은 변화가 없이 0만 찍히네요. ㅜㅜ

그럼 다음 시간에 끝을 냅시다.
진짜 코드 하나만 추가하면 화면에 바로 늘어나는 숫자가 반영됩니다.
봐주셔서 감사합니다. 문의 또는 잘못된 설명은 아래의 댓글에 부탁드립니다.
당신의 작은 누름이 저에게는 큰 희망이 됩니다.

댓글 0개
정렬기준